赛派号

粉底液哪一款好用推荐一下 How to get started with the Snipping Tool app in Windows 11

Share by: Facebook X Whatsapp Pinterest Flipboard Share this article 0 Join the conversation Follow us Add us as a preferred source on Google

On Windows 11, you can use the Snipping Tool to take screenshots, extract text, and pick color codes without resorting to third-party utilities. In this guide, I will outline the steps to get started and get the most out of the app.

The new Snipping Tool app replaces the old Snipping Tool and Snip & Sketch (still ailable on Windows 10) with a new experience that combines the best of both.

You may like Windows 11 Recall app All you need to know to get started with Recall on Windows 11 Windows 11 Click to Do How to use Click to Do on Windows 11 with your new Copilot+ PC Images of the Windows 11 Start menu and icons Windows 11 tip: master your Start Menu customization Microsoft's Surface Pro 12-inch 1st Edition (2025) powered by Qualcomm Snapdragon X Plus processor. Your Copilot PC is ready to go — but one setup step unlocks its real power Disclaimer

These instructions he been updated to ensure accuracy and reflect changes to the process in the application.

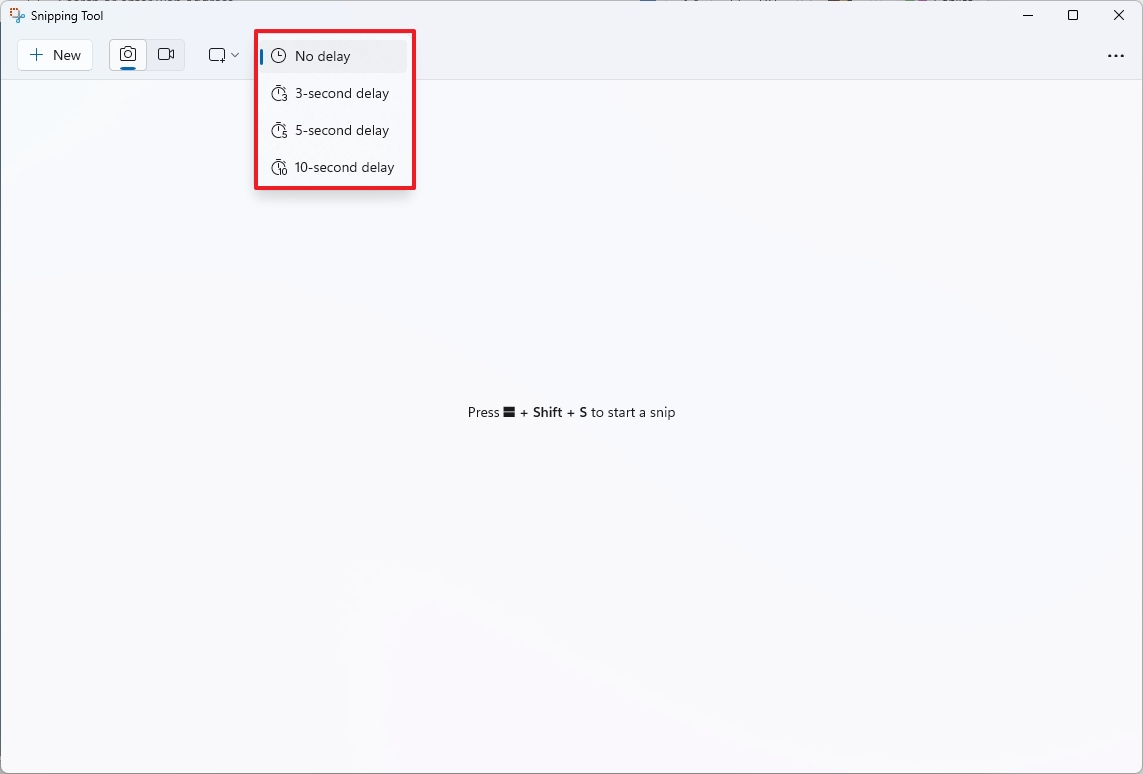
How to use Snipping Tool to take screenshots

The Snipping Tool is a straightforward app that lets you take screenshots in Windows 11 via the app or a shortcut. The app also includes settings you can configure, including the ability to use the "Print screen" key instead of the "Windows key + Shift + S" shortcut.

Screen capture via app

To take screenshots through the Snipping Tool app, use these steps:

Get the Windows Central Newsletter

All the latest news, reviews, and guides for Windows and Xbox diehards.

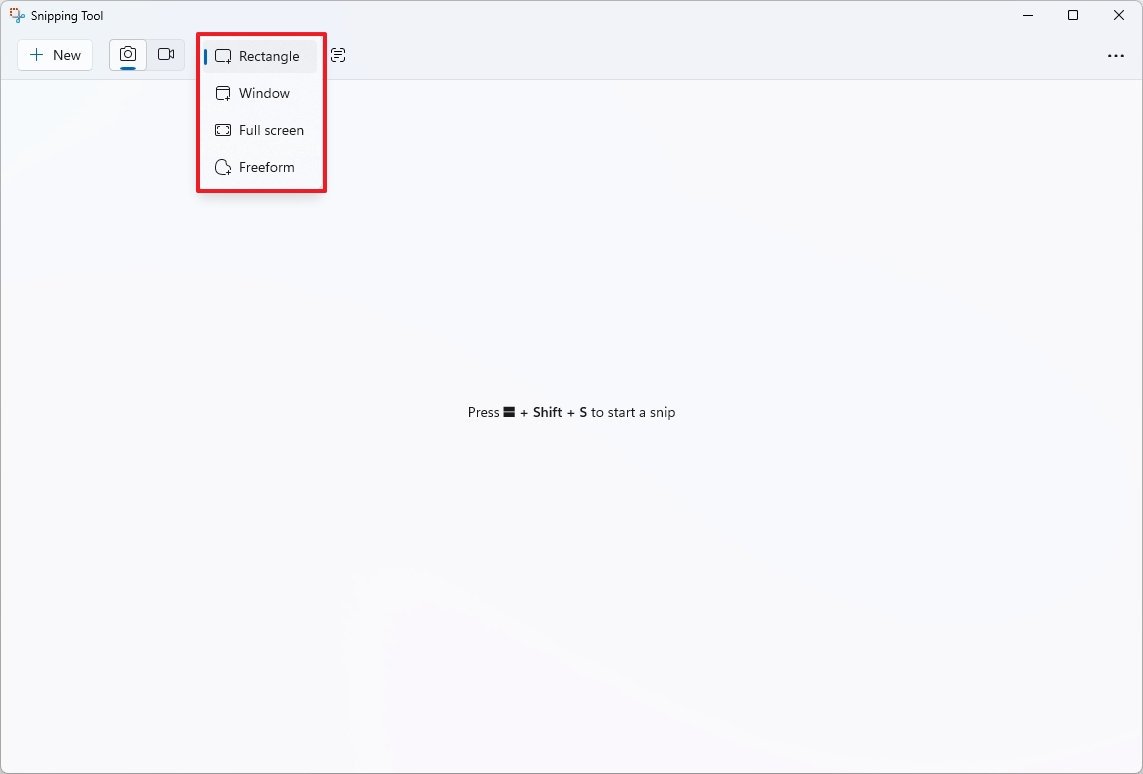
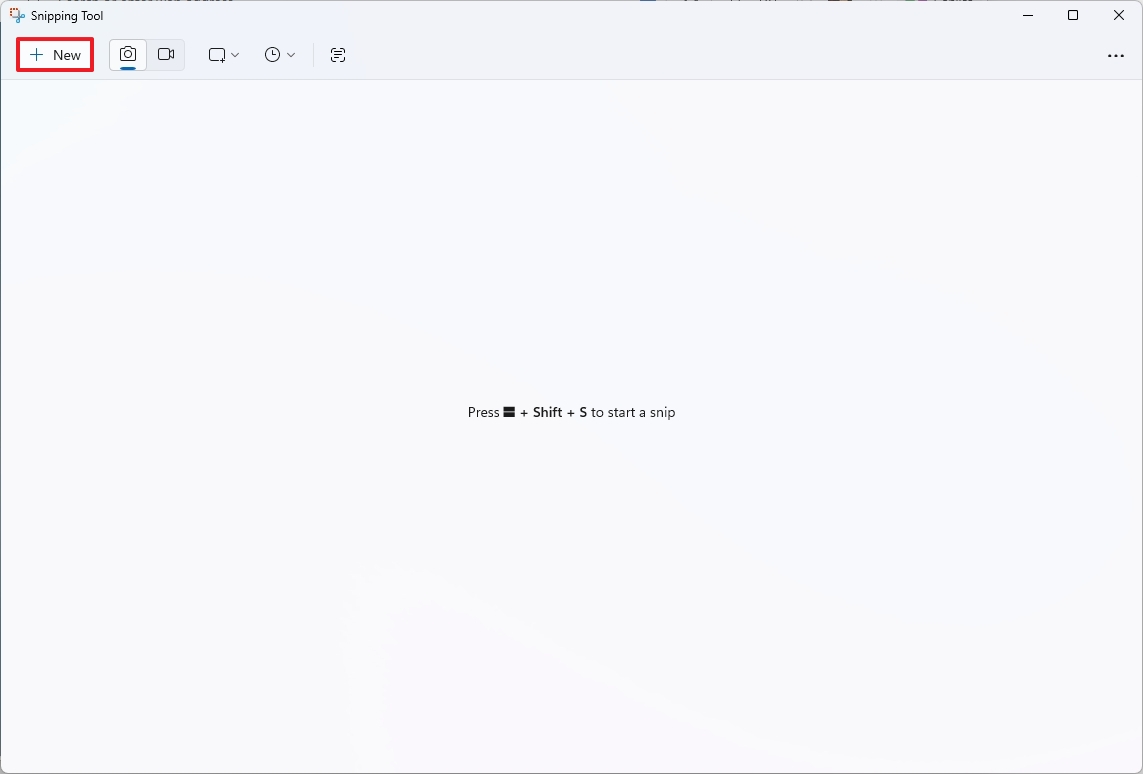
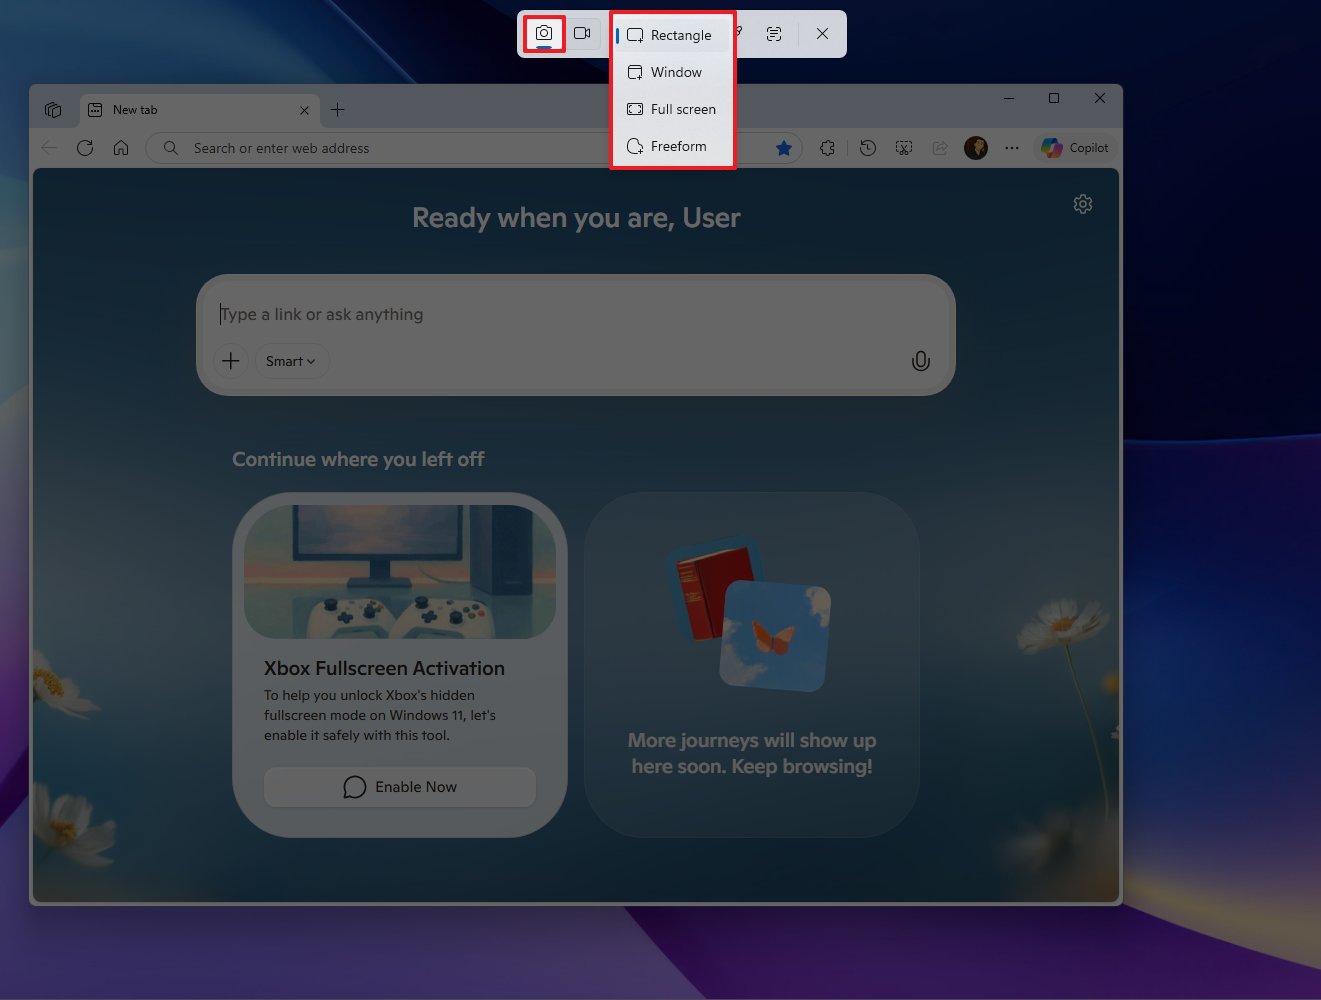
By submitting your information you agree to the Terms & Conditions and Privacy Policy and are aged 16 or over.Open Start.Search for Snipping Tool and click the top result to open the app.Select one of the ailable screen capture modes, including:Rectangle mode: creates a rectangle screenshot using the mouse.Window mode: ses a screenshot of a window.Full-screen mode: takes a screenshot of the entire screen.Free-form mode: allows you to use the mouse to select any form you want from the screen.

Snipping Tool app screenshot options

(Image credit: Mauro Huculak)(Optional) Use the Delay option to delay the capture for up to 10 seconds.

Snipping Tool app delay options

(Image credit: Mauro Huculak)Quick note: This option can be handy when trying to capture a specific action.Click the New button.

Snipping Tool create new screenshot option

(Image credit: Mauro Huculak)Create the screenshot with the mode you selected.Click the "Capture" button if you're using the "Rectangle" option.

Snipping Tool capture option

(Image credit: Mauro Huculak)

Once you complete the steps, the screenshot will open in the Snipping Tool editor, where you can se the capture or annotate it before sharing it.

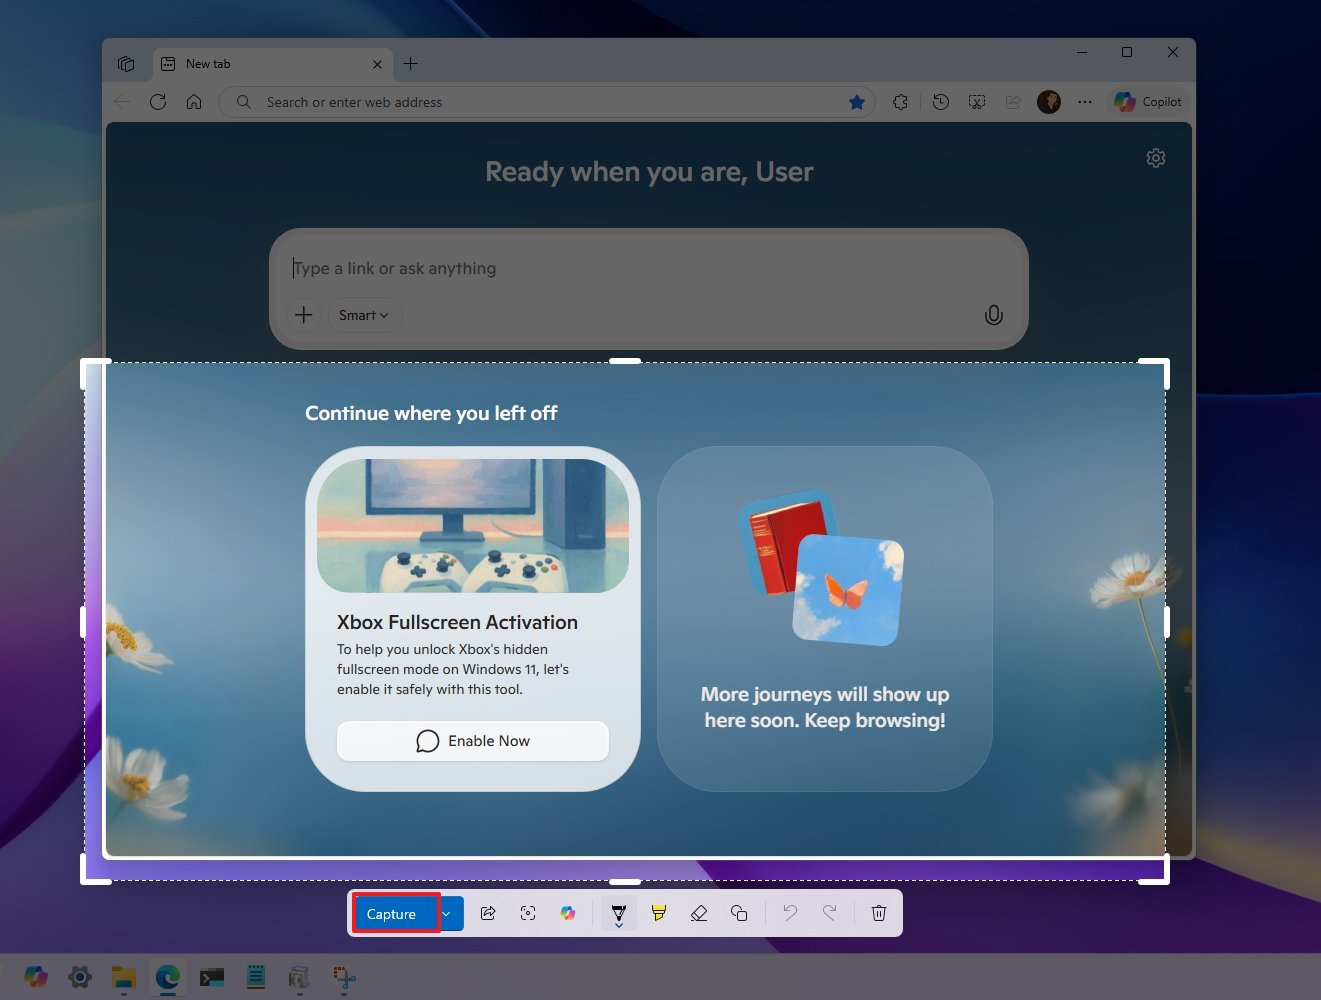
It's worth noting that when using the "Rectangle" option, after selecting the area to capture, you'll notice different actions, including Share, Visual Search with Bing, and Copilot.

You'll also he access to the different tools to annotate even before taking the screenshot.

Screen capture via shortcut

Alternatively, you can use a keyboard shortcut to quickly open the tools for taking a screenshot in Windows 11. Here's how:

Use the "Windows key + Shift + S" keyboard shortcut.Select one of the screen capture modes:Rectangle modeWindow modeFull-screen modeFree-form mode

Snipping Tool shortcut screenshots

(Image credit: Mauro Huculak)Create the screenshot with the mode you selected.Click the "Capture" button if you're using the "Rectangle" option.

Snipping Tool capture option

(Image credit: Mauro Huculak)

After you complete the steps, the capture will open with the Snipping Tool editor.

Basic screenshot editing

To edit and se the screenshot, use these steps:

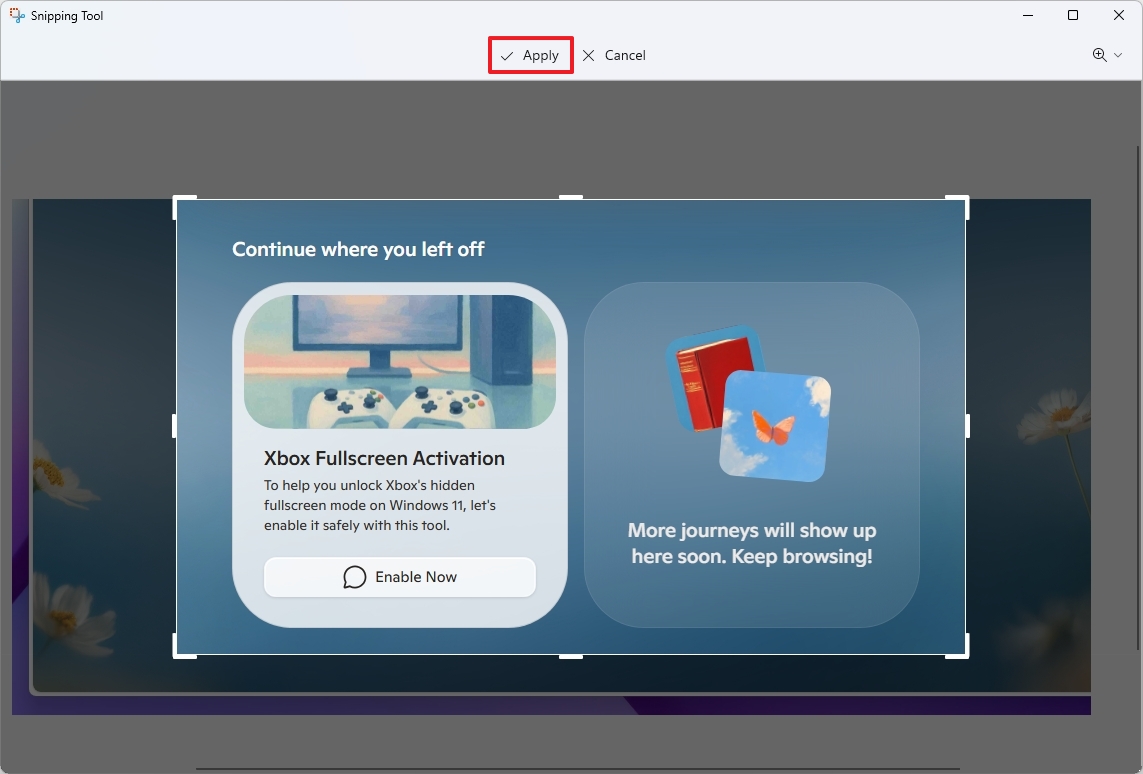
Click the Image Crop tool in the command bar.Use the edges to crop and resize the screenshot.Click the Apply button to apply the changes.

Snipping Tool apply cropping

(Image credit: Mauro Huculak)Use the "Ballpoint pen, Highlighter," or "Touch Writing" features to annotate the image.

Snipping Tool annotation feature

(Image credit: Mauro Huculak)Quick tip: The Ballpoint pen and Highlighter offer different options to change the color and stroke size for annotating the image.Use the Eraser tool to delete strokes.(Optional) Click the Copy button from the top right to copy the image to the clipboard and paste it into a document.Click the Se button from the top right to se the screenshot as an image file (.jpg, .png, or .gif).Click the Share button in the top-right corner to share the capture with other people using different apps.

Snipping Tool erase option

(Image credit: Mauro Huculak)

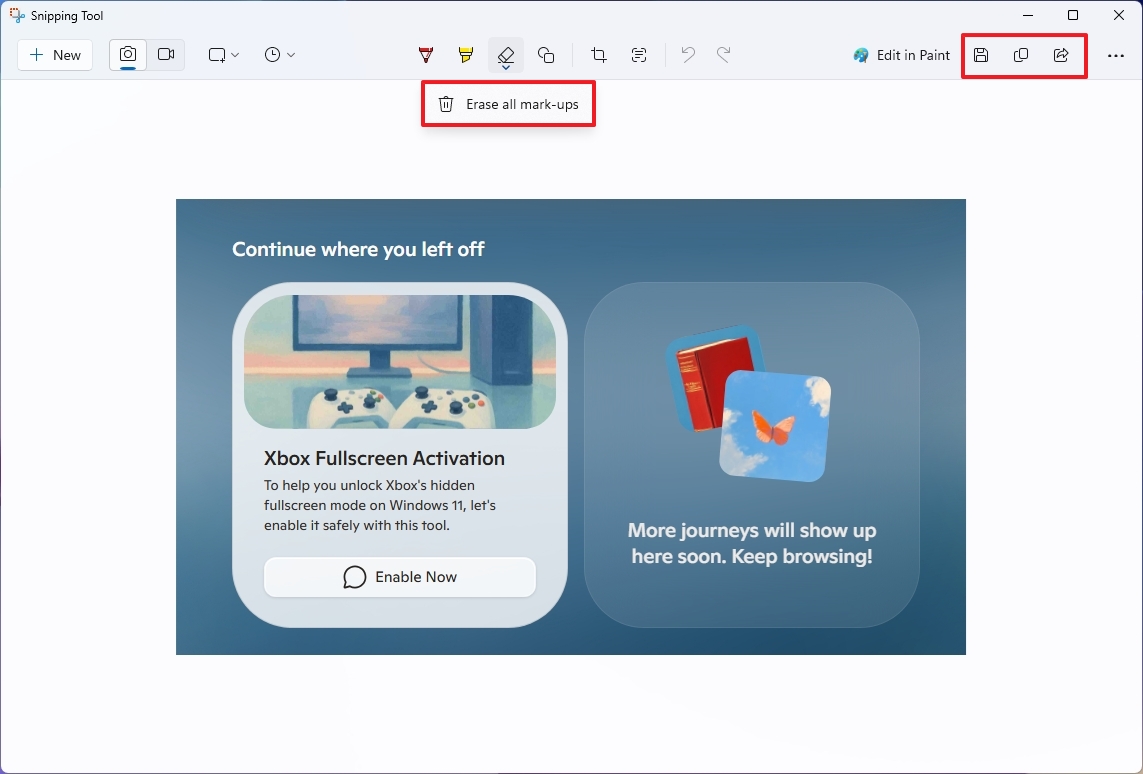
Once you complete the steps, the screenshot will be sed on the computer.
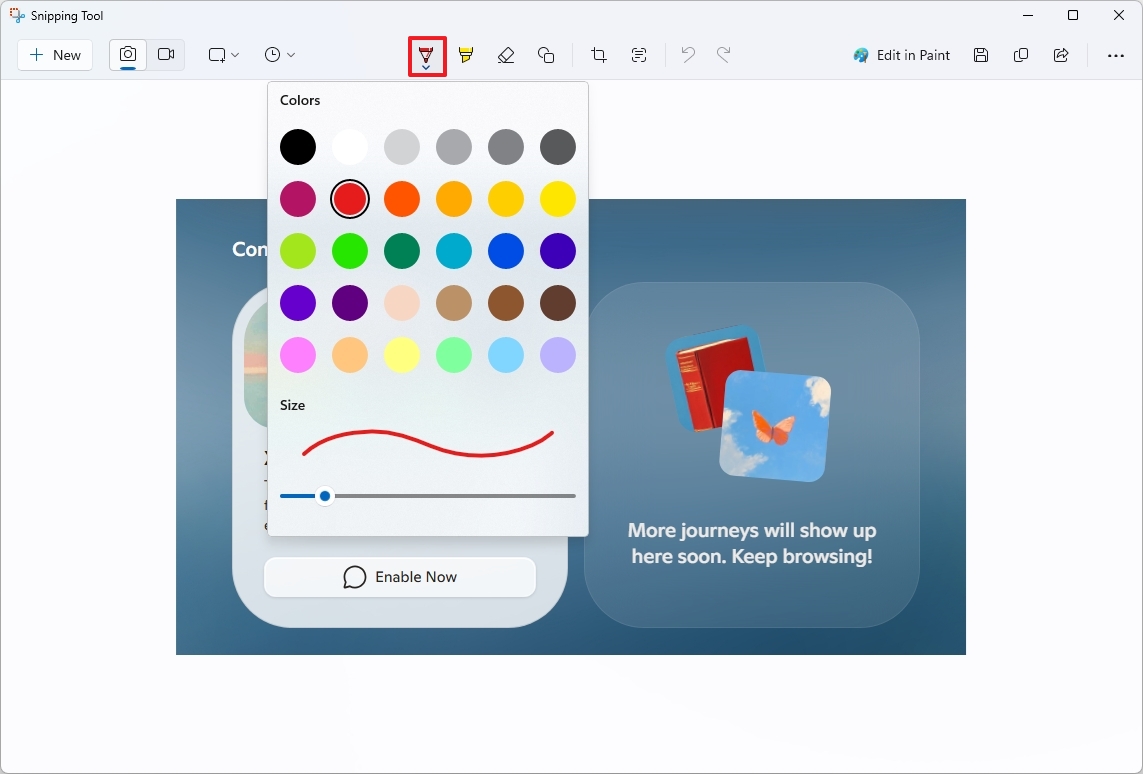
Adding shapes to screenshot

To add shapes to the screenshot, use these steps:

Click the Shapes button from the command bar.Choose the shape (square, circle, straight line, or arrow).

Snipping Tool shapes

(Image credit: Mauro Huculak)Open the Fill menu and choose the color (if applicable).Open the Outline menu and choose the outline color and size.

Snipping Tool outline color and size

(Image credit: Mauro Huculak)Create the shape on the image.

Snipping Tool create shape

(Image credit: Mauro Huculak)Click the Se button.Choose the location to store the video recording.Click the Se button one more time.

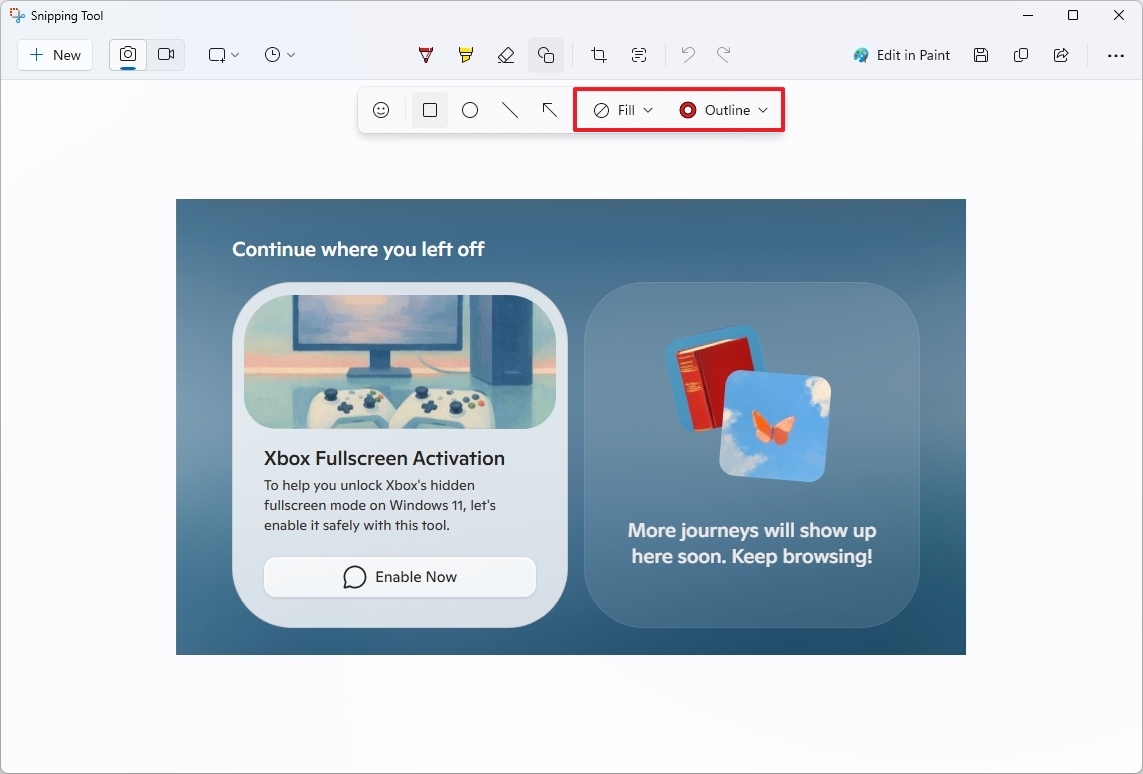
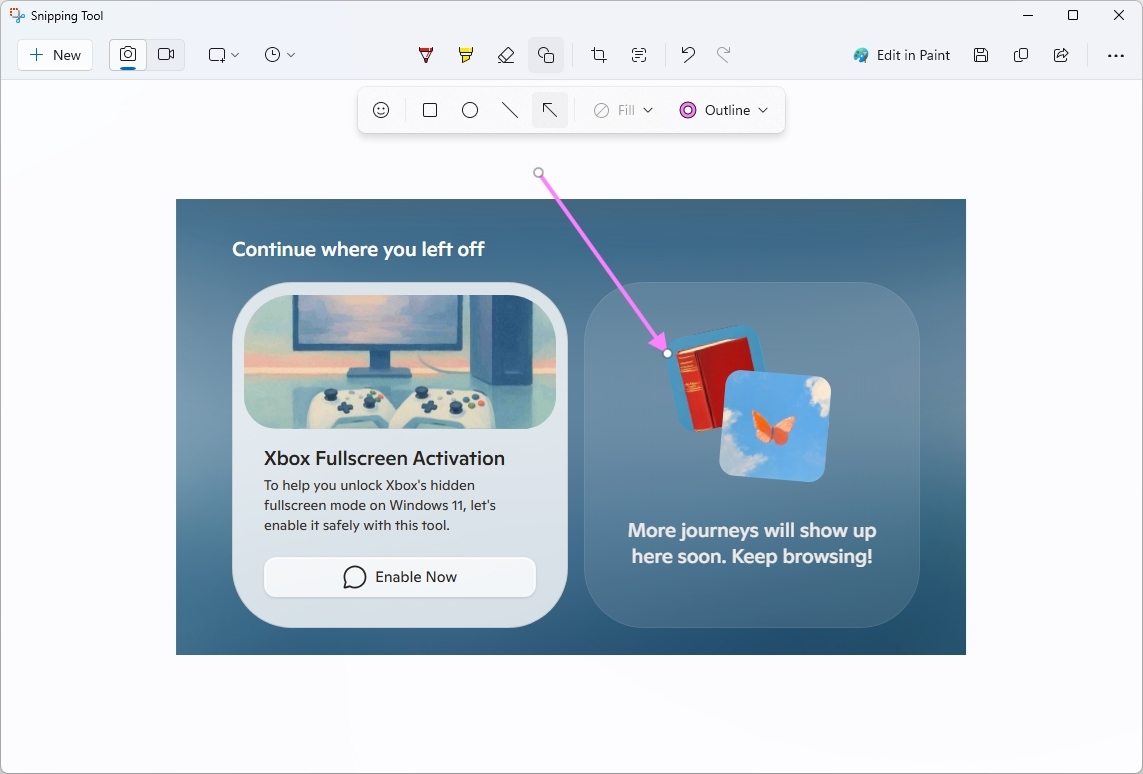
Once you complete the steps, the shape will be added to the screenshot.

Redact or extract text on screenshot

To redact text to hide sensitive information on a screenshot, use these steps:

Click the Text actions button from the command bar.(Option 1) Select the desired text, right-click the selection, and choose the Copy text option.

Snipping Tool extract text

(Image credit: Mauro Huculak)Quick tip: You can also use the "Copy all text" option from the "Text actions" menu.(Option 2) Select the desired text, right-click the selection, and choose the Redact text option.

Snipping Tool redact text

(Image credit: Mauro Huculak)Quick tip: You can also use the "Quick redact" option from the "Text actions" menu to redact emails and numbers automatically. Also, from the drop-down menu, you can choose the details the app can redact automatically.

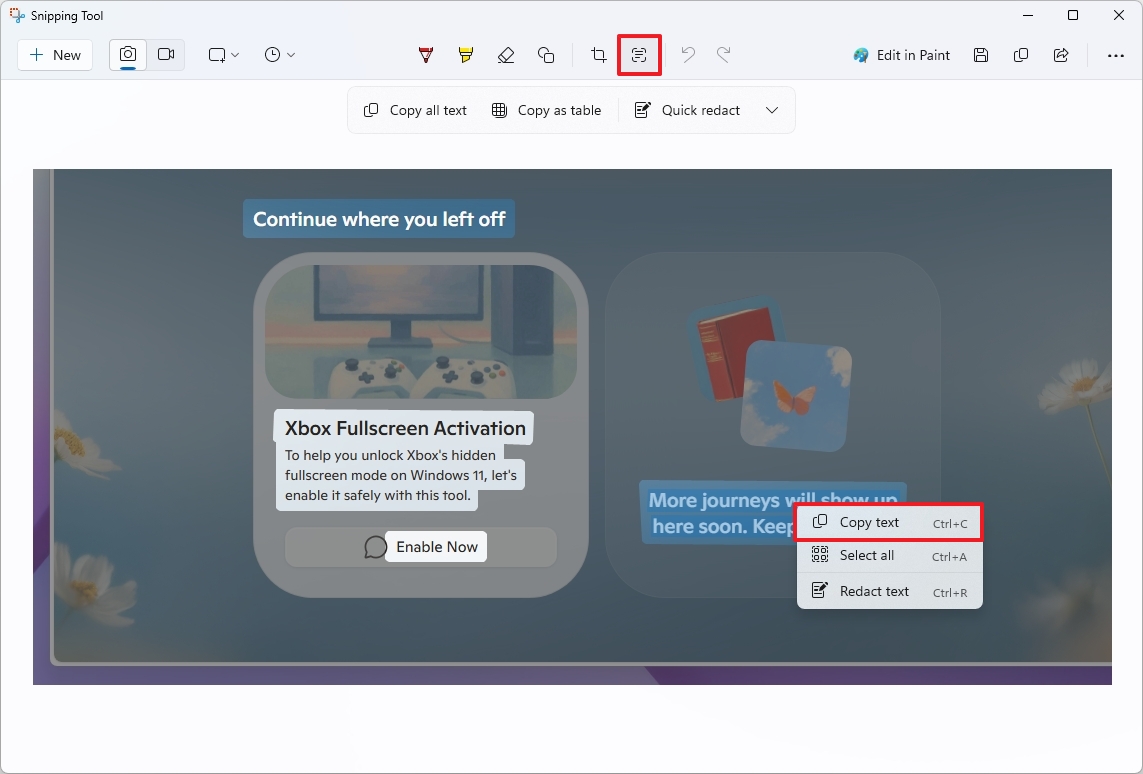
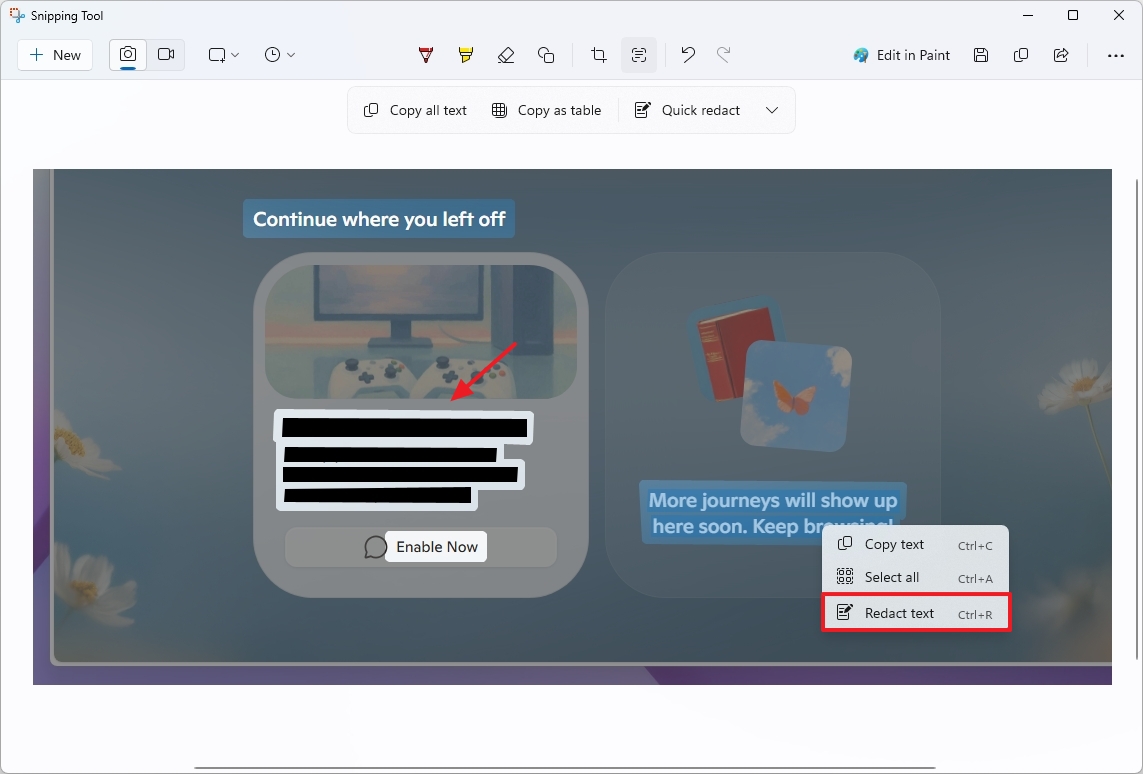
Once you complete the steps, the sensitive information will be redacted on the screenshot.

How to use Snipping Tool to screen recording

To record the screen with the Snipping Tool app, use these steps:

Open Start.Search for Snapping Tool and click the top result to open the app.Click the Record button.Click the New button.

Snipping Tool app screen recording

(Image credit: Mauro Huculak)Choose an area of the screen to record.Click the Microphone menu and select the voice capture device. (You can also choose the "Mute" button to disable audio capture.)(Optional) Click the "Mute system audio" button to prevent the app from recording audio from your computer.Click the Start button.

Snipping Tools screen recording

(Image credit: Mauro Huculak)Continue with the interaction you want to capture.Click the Stop button.

Stop screen recording

(Image credit: Mauro Huculak)Quick note: You can click the "Delete" (trash) button to discard the recording and start over.(Optional) Click the Play button to playback the screen recording.

Snipping Tool screen recorder controls

(Image credit: Mauro Huculak)Click the Se button.Choose the location to store the video recording.Click the Se button one more time.

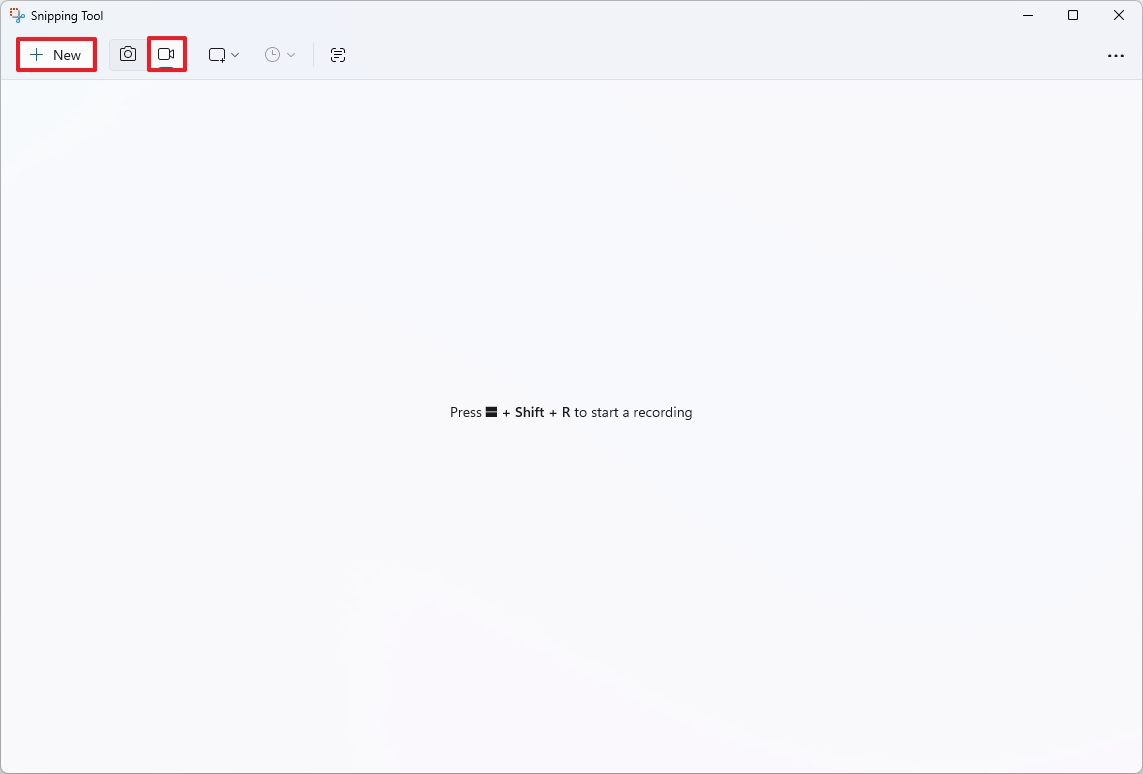
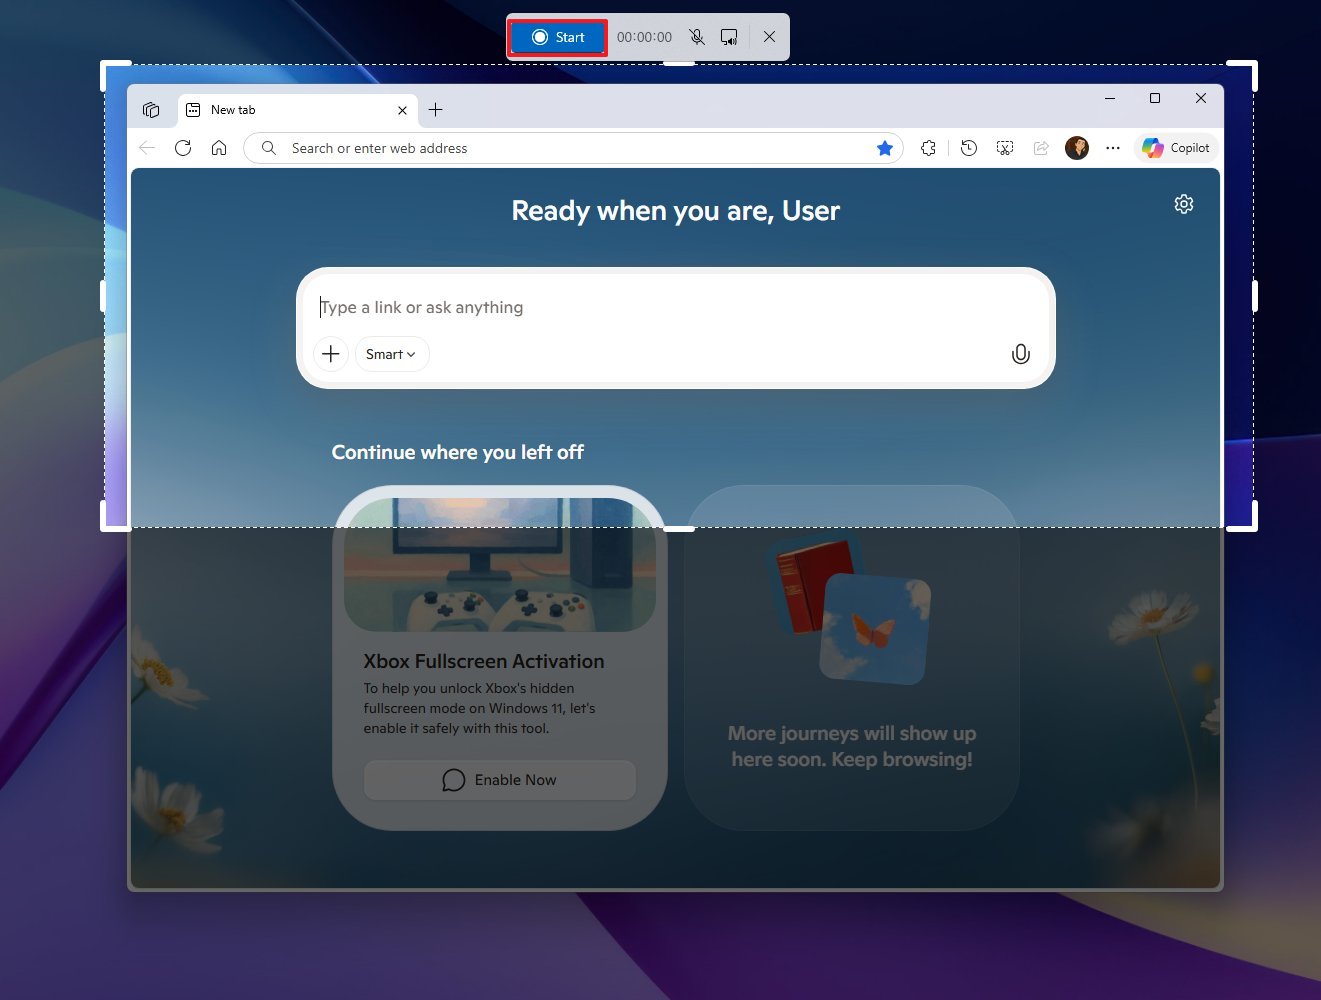
Once you complete the steps, Snipping Tool will create a video file with the screen recording.

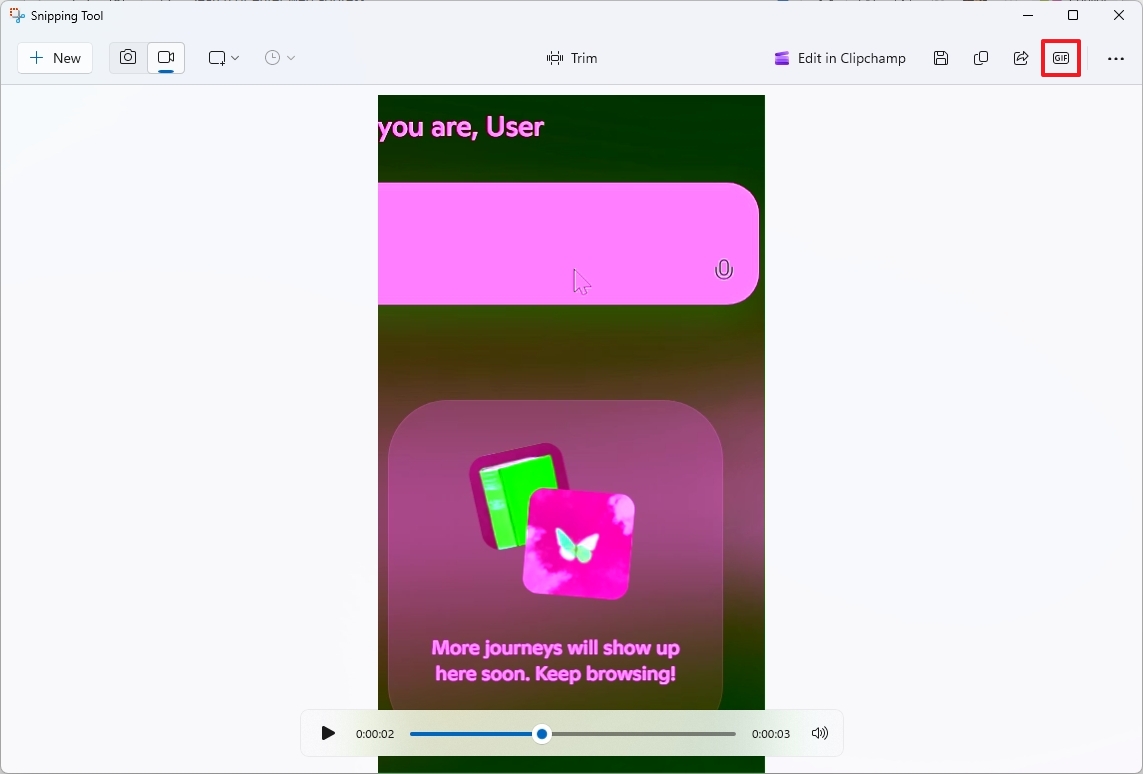
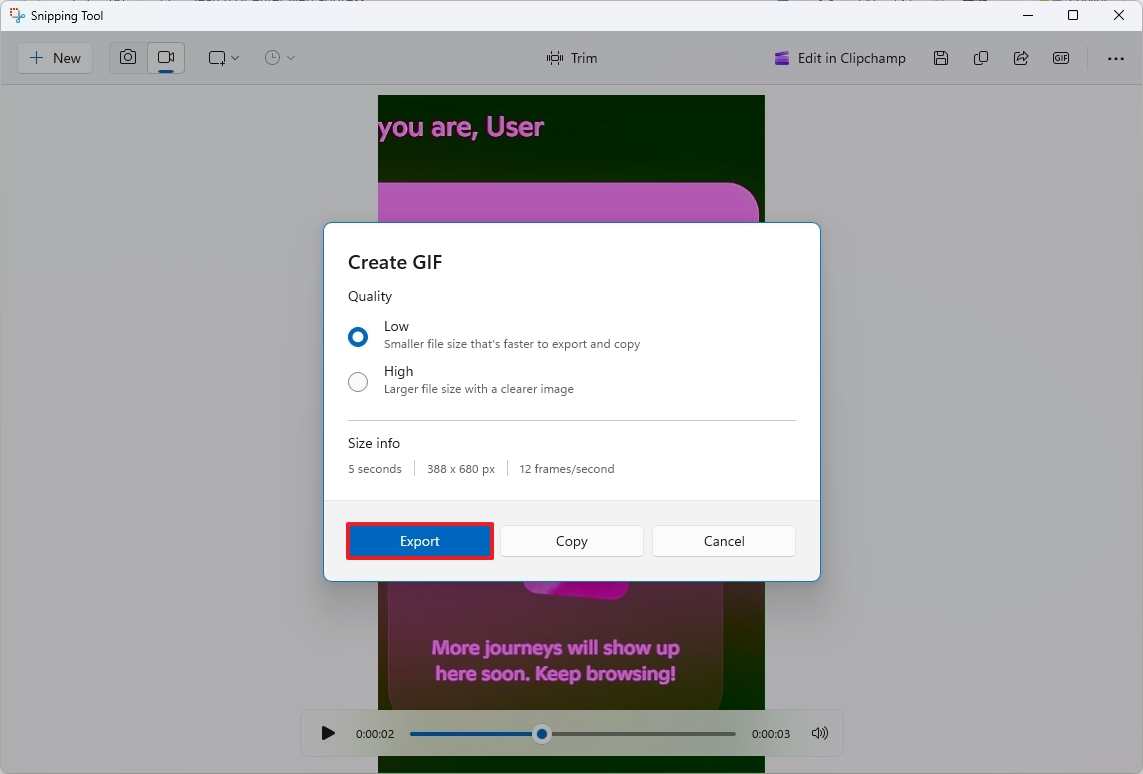
Create an animated GIF with Snipping Tool

In addition to recording videos, the Snipping Tool also includes an option to create GIFs through the screen recording feature.

To create an animated GIF, use these steps:

Open Start.Search for Snapping Tool and click the top result to open the app.Click the Record button.Click the New button.

Snipping Tool app screen recording

(Image credit: Mauro Huculak)Choose an area of the screen to record.Choose the "Mute" button.Click the "Mute system audio" button.Click the Start button.

Snipping Tool record GIF video

(Image credit: Mauro Huculak)Capture the action you want in the GIF file.Click the Stop button.Click the GIF button from the top-right.

Snipping Tool create GIF option

(Image credit: Mauro Huculak)Choose the quality of the GIF file.Click the Export button.

Snipping Tool export GIF file

(Image credit: Mauro Huculak)How to change settings on Snipping Tool

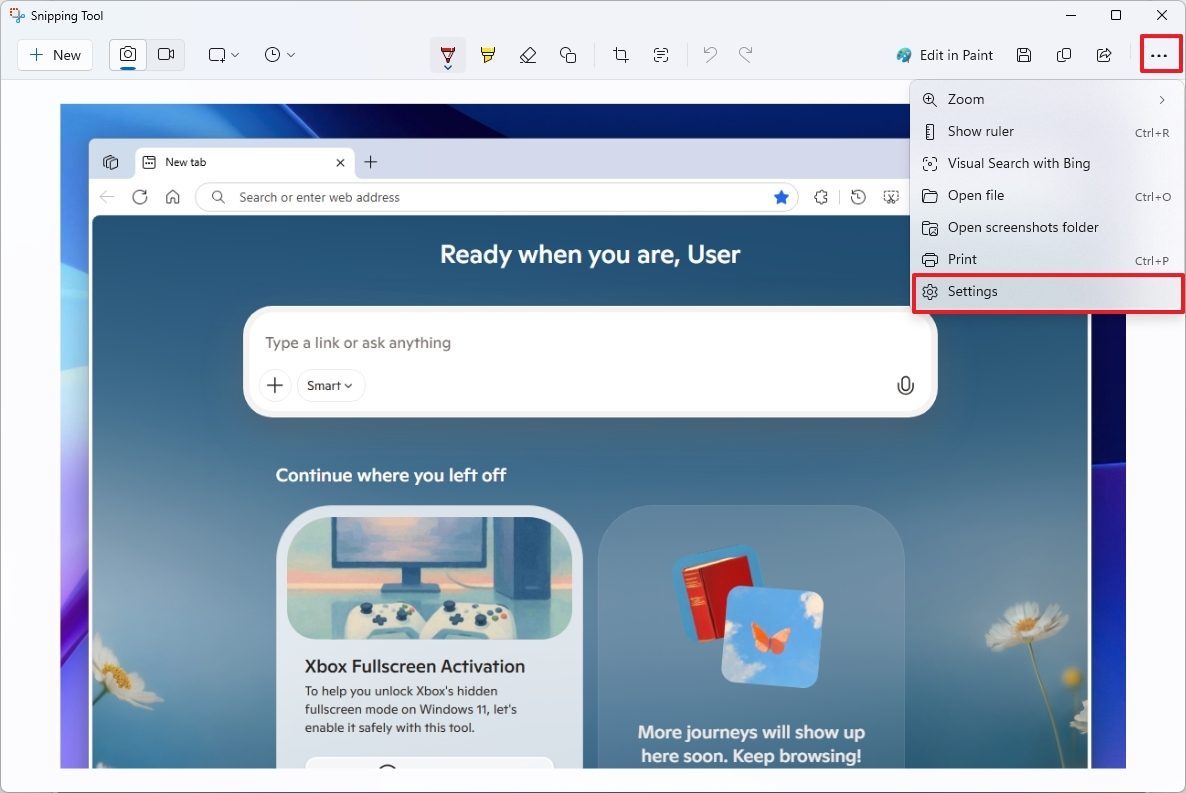
The Snipping Tool lets you configure various settings.

To change the app settings, use these steps:

Open Start.Search for Snipping Tool and click the top result to open the app.Click the See more (three-dotted) menu and select the Settings option.

Snipping Tool open Settings

(Image credit: Mauro Huculak)In the Settings page, enable or disable the "Snipping" options as needed:Automatically copy changes: Copies the capture to the clipboard for easy pasting onto documents.Automatically se original screenshots: Ses the capture into the Screenshots folder automatically.Ask to se edited screenshots: Ask to se the capture as you close the editor.Multiple windows: Launches a new instance of the app for each capture.Add border to each screenshot: Inserts borders to each snip automatically.HDR screenshot color corrector: Adjusts colors for screenshots taken on HDR monitors.

Change Snipping Tool settings

(Image credit: Mauro Huculak)On this page, you can also adjust the "Screen recording" settings:Automatically copy changes: Copies the capture in the clipboard for easy pasting onto documents.Automatically se original screen recordings: Ses capture into the Screen recording folder automatically.Ask to se edited screen recordings: Ask to se the capture as you close the editor.Include microsoft input by default when a screen recording starts.Include system audio by default when a screen recording starts.

Screen Recording Snipping Tool settings

(Image credit: Mauro Huculak)Select the App theme setting under the "Appearance" section.Select the color theme. Options ailable:Light.Dark.Use system setting.Click the "Use the Print screen key to open Snipping Tool" button under the "Shortcuts" section.Click the Yes button.Turn on the "Use the Print screen button to open screen snipping" toggle switch to use the Print screen key instead of the "Windows key + Shift + S" keyboard shortcut to open the tool.

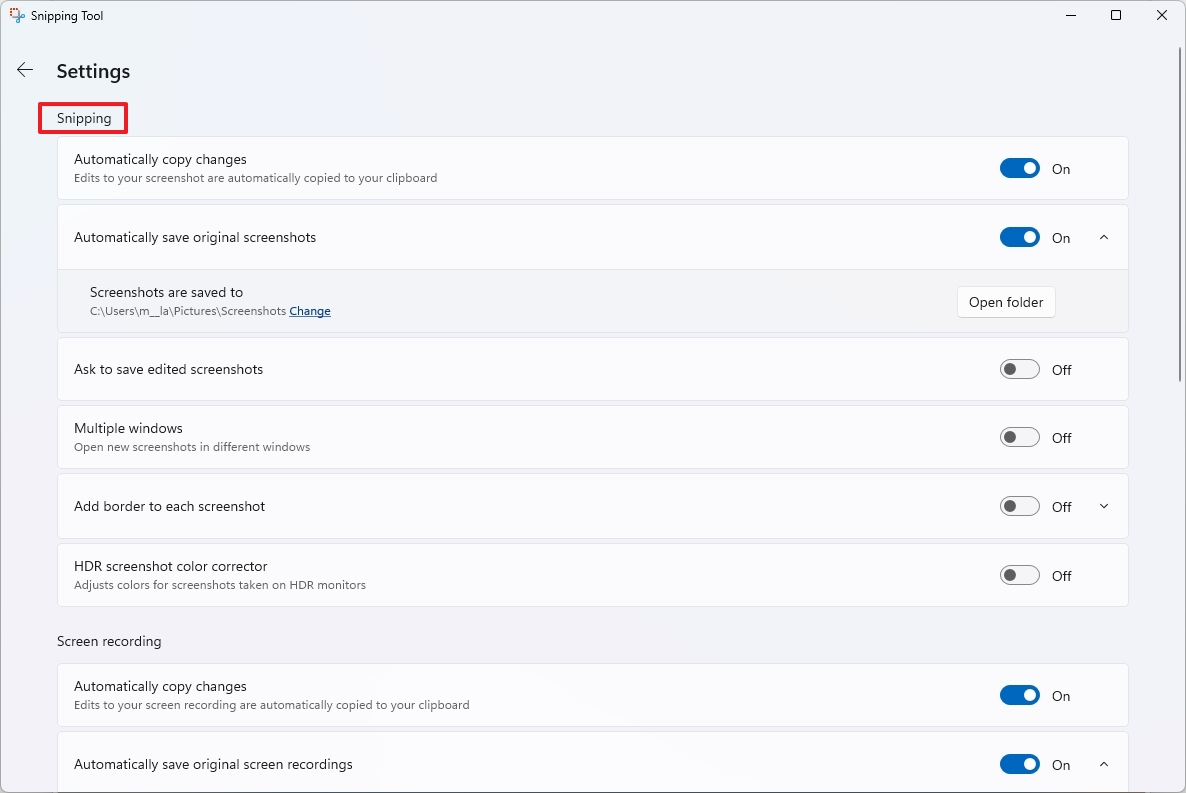
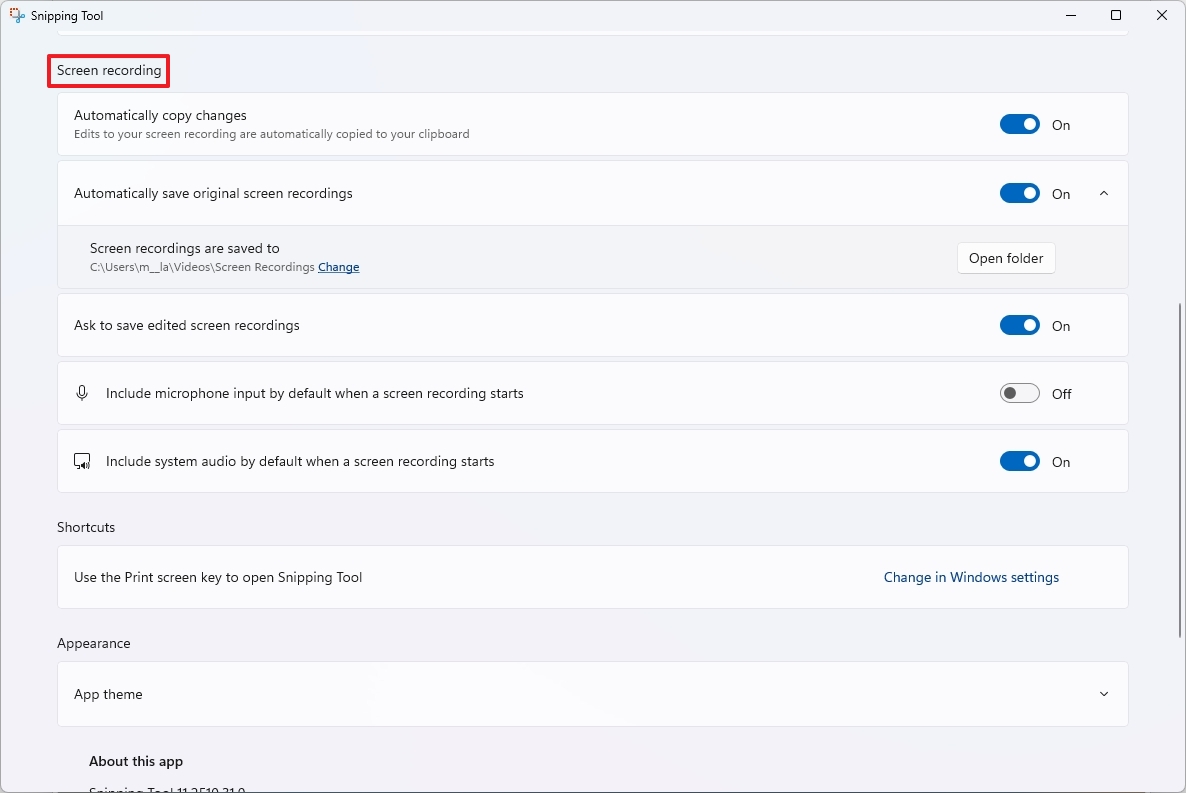
After you complete the steps, the settings will apply automatically.

How to use Snipping Tool toolbar as a color picker

The Snipping Tool also includes a feature that allows to determine the color code for any pixel on the screen with the "Color Picker" tool.

To use the Snipping Tool Color Picker, use these steps:

Open the Snipping Tool toolbar (Windows key + Shift + S).Click the Color Picker button.

Snipping Tool Color Picker

(Image credit: Mauro Huculak)Select the color code, including HEX, RGB, or HSL.Hover and click over the color you want to identify.

Color picker on Windows 11

(Image credit: Mauro Huculak)

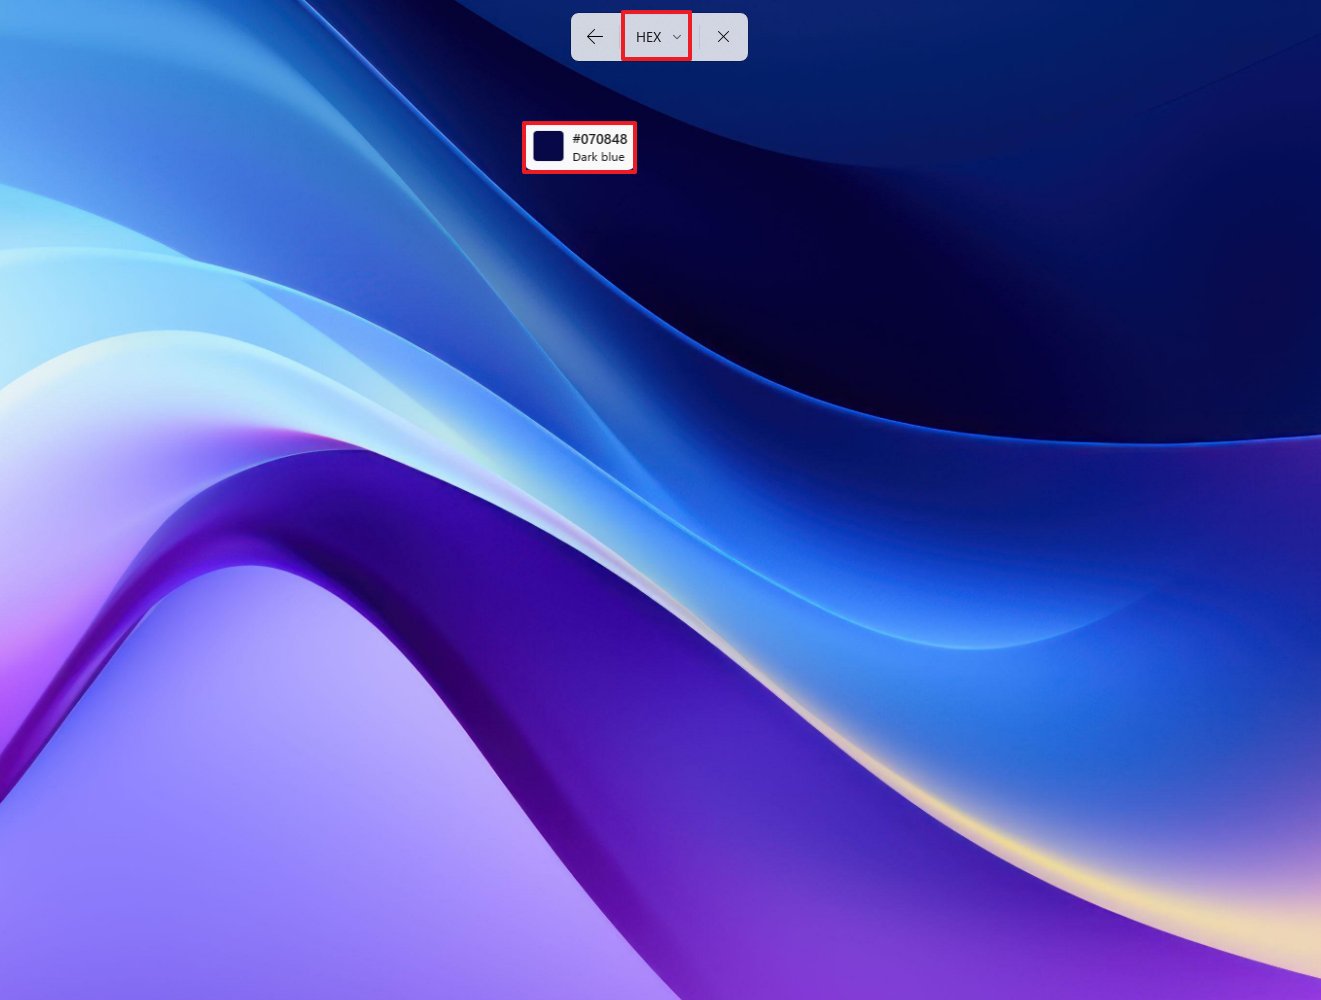
Once you complete the steps, the color code will be copied to the clipboard.

How to use Snipping Tool toolbar as a text extractor

In addition to extracting text from the screenshot editor, you can also use the toolbar's "Text extractor" option to extract text from anything on the screen.

To extract text from the screen, use these steps:

Open the Snipping Tool toolbar (Windows key + Shift + S).Click the Text extractor button.

Snipping toolbar text extractor

(Image credit: Mauro Huculak)Select the area with text that you want to copy.Select the text or click the "Copy all text" button.

Snipping toolbar extract text

(Image credit: Mauro Huculak)

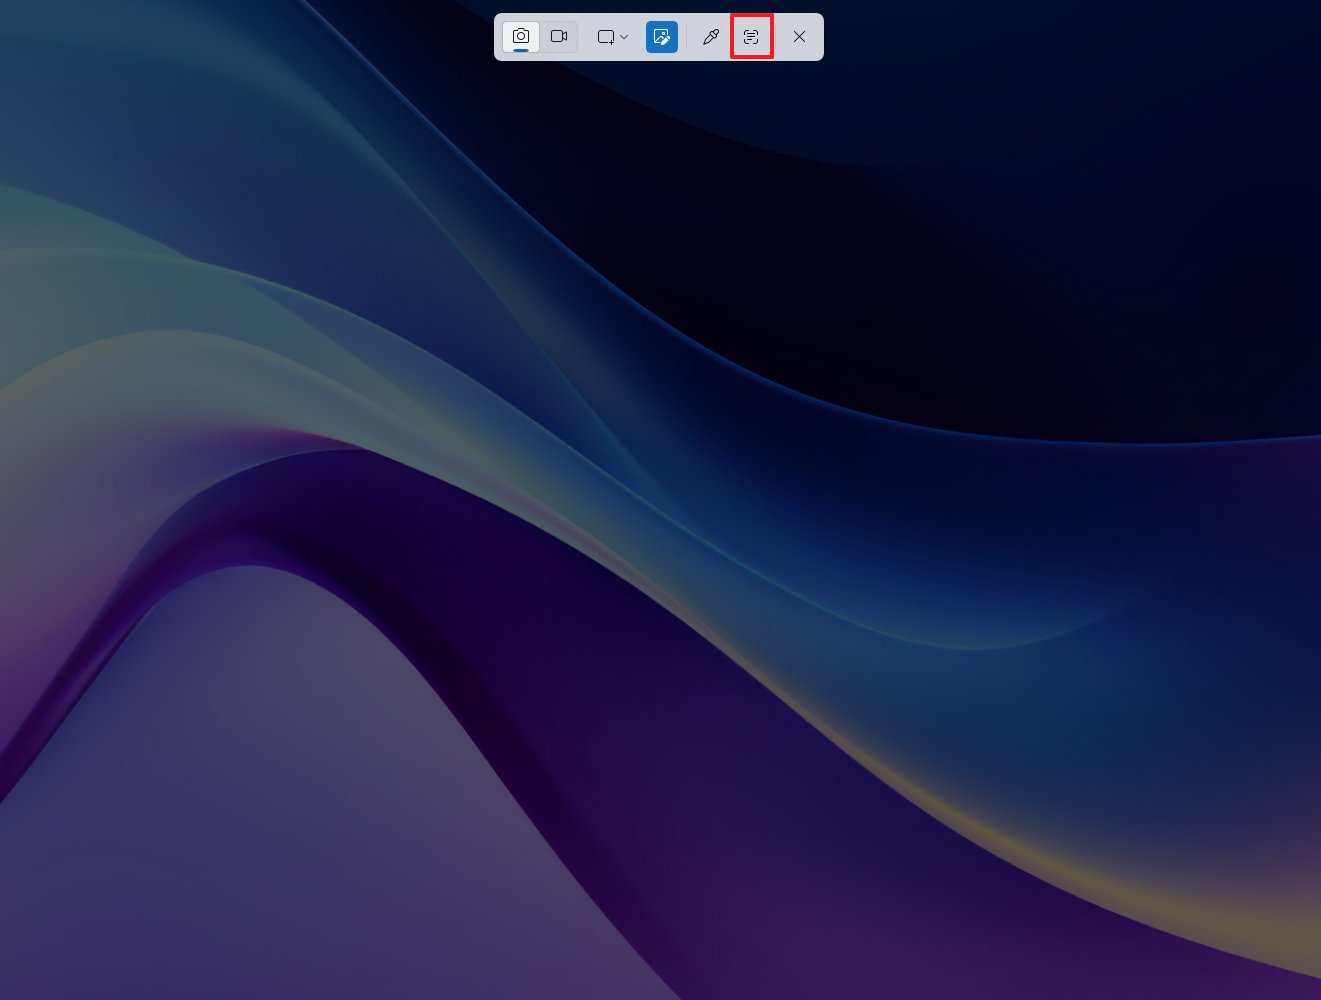
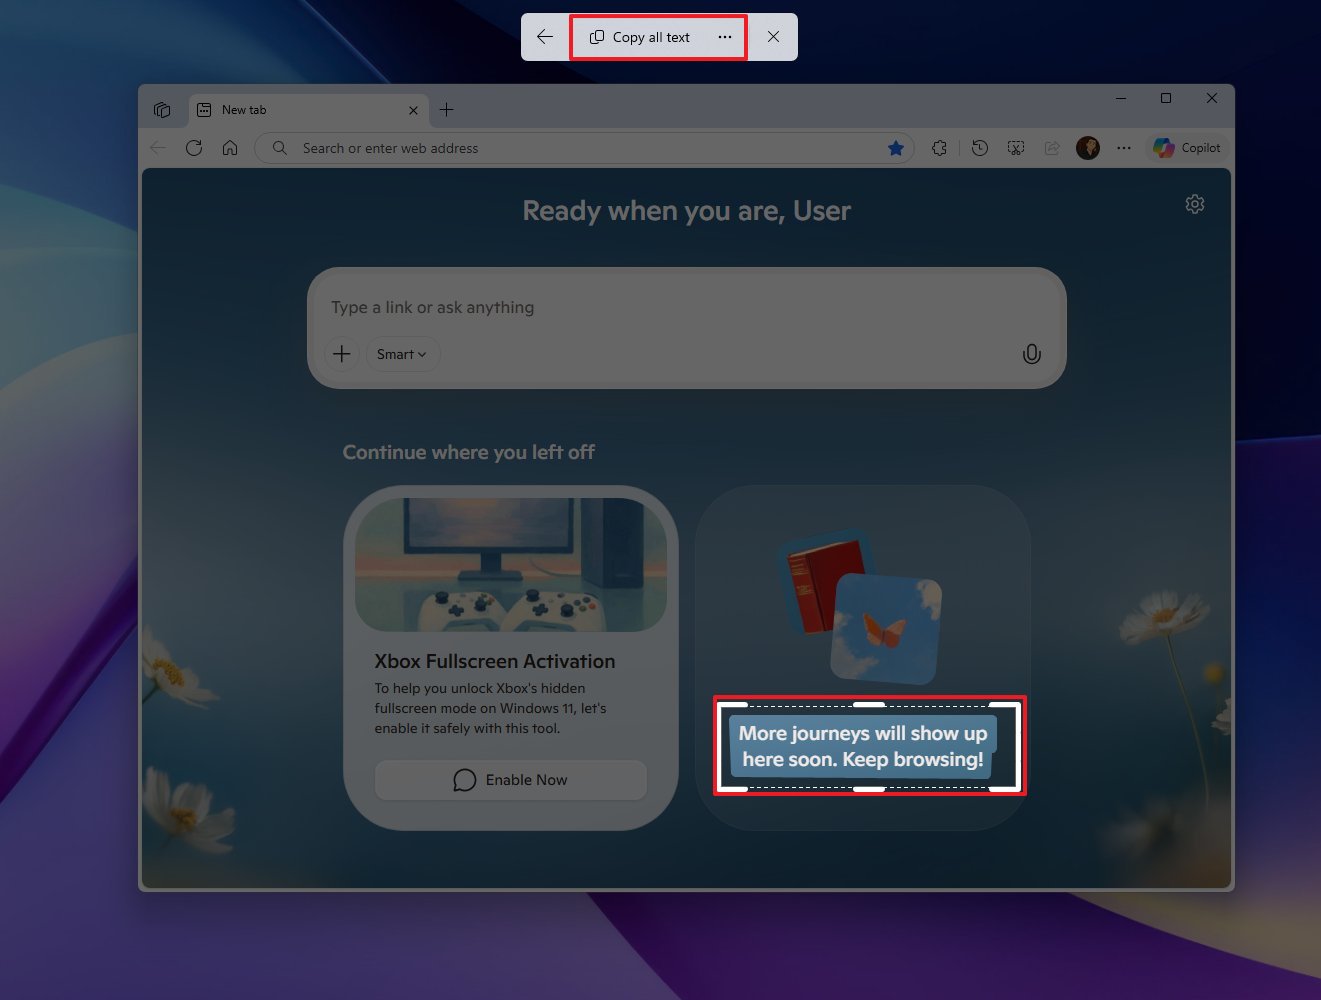
After you complete the steps, the extracted text will be copied to the clipboard.

More resources

Explore more in-depth how-to guides, troubleshooting advice, and essential tips to get the most out of Windows 11 and 10. Start browsing here:

Windows 11 on Windows Central — All you need to knowWindows 10 on Windows Central — All you need to know

Follow us on Google Discover.

Follow Windows Central on Google News to keep our latest news, insights, and features at the top of your feeds!

版权声明:本文内容由互联网用户自发贡献,该文观点仅代表作者本人。本站仅提供信息存储空间服务,不拥有所有权,不承担相关法律责任。如发现本站有涉嫌抄袭侵权/违法违规的内容, 请发送邮件至lsinopec@gmail.com举报,一经查实,本站将立刻删除。

上一篇 没有了

下一篇没有了