Drawing a tree might seem hard, but it’s simpler than you think. With the right steps, anyone can do it.
Learning to draw a tree can be a fun and relaxing activity. Whether you鈥檙e a beginner or a seasoned artist, capturing the beauty of nature in your artwork can be deeply rewarding. Trees are a fundamental subject in many art pieces, providing not just structure but also a sense of life and growth.
This guide will walk you through the process, helping you understand the basic shapes and details needed to create a realistic tree. By following these steps, you can improve your drawing skills and enjoy the creative process. So, grab your pencil and let鈥檚 start drawing!
Materials NeededDrawing a tree can be a delightful and fulfilling experience. To start, you need the right materials. These items will help you bring your tree to life on paper. Let’s dive into the essentials you’ll need for this artistic journey.
Drawing ToolsFirst, gather your drawing tools. A set of pencils is a must. Use different grades, from hard (H) to soft (B) pencils. Hard pencils are good for light lines. Soft pencils help with shading. A good eraser is also crucial. It allows you to correct mistakes. A sharpener keeps your pencils ready. Lastly, a blending stump can help smooth out your shading.
Paper TypesThe type of paper you choose matters. Regular printer paper works for practice. For better results, use drawing paper. It has a rough texture that holds pencil marks well. Thick paper can handle more pressure and shading. If you plan to add color, consider watercolor paper. It is thicker and can handle wet media without warping.
 Basic Tree Structure
Understanding the basic structure of a tree is key to drawing it accurately. Trees he a simple yet intricate design that can be broken down into parts. Let’s focus on the trunk outline and branch placement to create a realistic tree drawing.
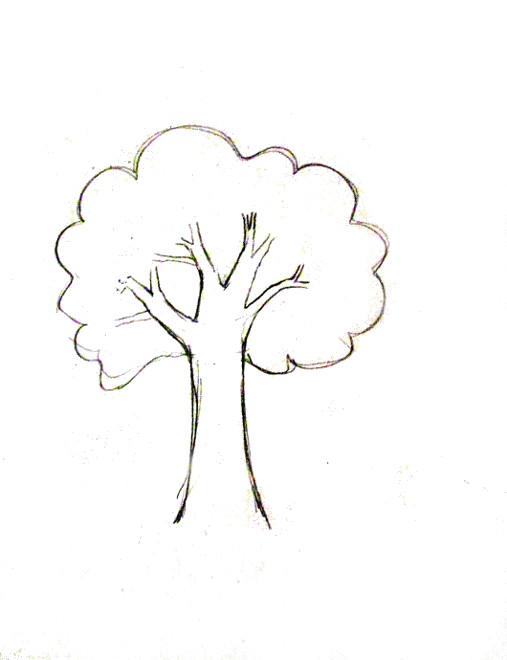
Trunk OutlineThe trunk is the base of your tree. Start with a vertical line. This will serve as the center of your trunk. From this line, draw two lines extending downwards. These lines should widen as they go down, giving the trunk a natural taper. The trunk is thicker at the bottom and thinner at the top.
To add texture, include some gentle curves and irregularities. Trees are not perfectly straight. Adding these small imperfections makes your tree look more realistic. You can also draw some horizontal lines across the trunk. These will represent the bark texture.
Branch PlacementBranches grow out from the trunk. Start by drawing the main branches. These should extend from the top third of the trunk. Draw these branches at various angles. Trees are not symmetrical, so oid making the branches too uniform.
Next, draw smaller branches off the main ones. These secondary branches should be thinner. They should also vary in length and direction. This randomness mimics nature and makes your drawing more realistic.
For a finishing touch, add some fine details. Draw tiny twigs at the ends of the branches. These small details add depth and complexity to your tree drawing.
Step Action 1 Draw a vertical line for the trunk 2 Extend two lines downwards for the trunk outline 3 Draw main branches from the top third of the trunk 4 Add smaller branches off the main ones 5 Include tiny twigs for detailBy following these steps, you can create a basic tree structure. This provides a strong foundation for your tree drawing.
Drawing The TrunkDrawing the trunk of a tree is an essential part of tree illustration. It’s the foundation of your tree and gives it strength and character. Let’s break down how to draw the trunk into easy steps.
Shape And ProportionStart with the basic shape of the trunk. Draw a long, vertical line to represent the center of the trunk. Then, outline the trunk’s width by adding two curved lines on each side of the center line. These lines should taper towards the top and widen at the base.
Ensure the trunk is proportionate to the rest of the tree. A good rule of thumb is to make the trunk about one-third the height of the entire tree. This will make your tree look balanced and realistic.
Texture And DetailsAdding texture and details will bring your trunk to life. Use short, quick strokes to create the appearance of bark. Vary the length and direction of these strokes to make the bark look natural. Focus on areas where the trunk curves or splits, as these spots usually he more texture.
Incorporate knots and rough patches to add character. Draw small, irregular circles or ovals to represent knots. Add lines around these knots to show the bark growing around them. This detail makes the trunk look weathered and aged.
You can also add roots at the base of the trunk. Draw thick, curved lines extending from the bottom of the trunk into the ground. This will give your tree a strong foundation and make it look firmly planted in the earth.
 Adding Branches
Adding branches to your tree drawing can bring it to life. This step is crucial in giving your tree its unique character. Let’s dive into how to add both main and smaller branches.
Main BranchesThe main branches are the backbone of your tree. Start by drawing a few thick lines from the trunk. These lines should spread out in different directions. Keep them uneven to make the tree look natural. Here’s a tip: make the branches thicker near the trunk and thinner as they extend.
Step Description 1 Draw thick lines from the trunk. 2 Spread lines in various directions. 3 Keep the branches uneven. 4 Thicken branches near the trunk. Smaller BranchesNow it’s time to add the smaller branches. These branches grow from the main branches. Draw thinner lines extending from the main branches. Make these lines shorter and more numerous. This will add depth and detail to your tree. Vary the angles and lengths to make them look organic.
Draw thin lines from main branches. Keep lines short and numerous. Vary angles and lengths.Remember, the branches should look natural and random. Don’t stress about perfection. Trees are unique and he their own charm.
Drawing The LeesDrawing the lees of a tree can be an exciting part of your artwork. Lees give the tree its character. They make it look alive. This section will guide you on how to draw lees in a simple way. We will look at different shapes of lees. Then, we will see how to group them together.
Leaf ShapesFirst, let’s talk about the shapes of lees. Not all lees are the same. Some are round. Others are long and narrow. Some lees he smooth edges. Others he jagged edges. Choose a shape that suits your tree. You can mix shapes for a natural look.
Clustering LeesNext, think about how to cluster your lees. Lees often grow in groups. Draw small clusters to make the tree look full. Start with a few lees in one area. Then add more around it. Overlap some lees. It gives depth to your drawing. Use light and dark shades for a realistic effect.
Creating DepthCreating depth is essential in drawing a realistic tree. Depth gives your tree a three-dimensional look, making it appear more lifelike. This section will guide you through techniques to achieve depth using shading and highlighting.
Shading TechniquesShading adds shadows to your tree, creating depth. Start by identifying the light source. This determines where your shadows will fall. Use a light pencil to draw the outline of the tree. Then, darken the areas that are away from the light. This creates a natural shadow effect.
Use different pencil pressures to create varying shades. Light pressure for lighter areas, and hey pressure for darker shadows. Blend these shades smoothly to oid harsh lines. This helps in creating a gradual transition from light to dark. Add texture by using short, light strokes to mimic the bark and lees.
HighlightingHighlighting brings out the areas of the tree that catch the most light. Use an eraser to lift some graphite from the lighter areas. This creates a highlight effect. Focus on the top and outer edges of the lees and branches. These are the areas that the light hits directly.
For more precise highlights, use a white pencil or a gel pen. Apply it gently to oid overpowering the shading. Highlights should blend naturally with the rest of the drawing. They should not look like separate parts. This balance of shading and highlighting gives your tree a realistic and three-dimensional appearance.
Finishing TouchesCompleting your tree drawing with finishing touches can bring it to life. These final details make your tree look more realistic. Let’s dive into the essential steps to perfect your artwork.
Refining DetailsFocus on adding texture to the bark. Use short, vertical lines. Vary the length and thickness of these lines. This creates the illusion of rough bark. Add some knots and small branches. These imperfections make your tree look natural.
Next, refine the lees. Use small, curved lines. Group them in clusters. Vary the size and shape of the lees. This adds depth and dimension. Don’t forget to add shadows. This gives your tree a three-dimensional look.
Adding Ground ElementsDraw the ground beneath your tree. Add some grass using short, vertical strokes. Vary the length and direction of the strokes. This makes the grass look natural.
Include some rocks or fallen lees. These details add realism to your scene. You can also add flowers or small plants. This creates a more vibrant and lively environment.
Finally, consider adding some shading around the tree. This helps to anchor it to the ground. Use light, horizontal strokes for a subtle effect. Your tree drawing now looks complete and realistic.
Common MistakesDrawing a tree can be a relaxing and enjoyable activity. Yet, many artists make common mistakes that affect the final result. Understanding these errors will help you improve your tree drawings. Let’s explore these common mistakes.
Incorrect ProportionsOne common mistake is drawing the tree with incorrect proportions. Many people draw the trunk too thin or too thick. The branches might be too long or too short. This can make the tree look unrealistic.
To oid this, observe real trees. Notice the balance between the trunk and branches. Use light sketch lines to map out the basic shape before adding details.
Here鈥檚 a simple proportion guide:
Trunk: Should be one-third the height of the tree. Main branches: Should be thicker near the trunk and taper off. Lees: Should cover around two-thirds of the tree’s height. Overcrowding DetailsAnother mistake is overcrowding details. Beginners often add too many lees or branches. This can make the drawing look cluttered.
Here are tips to oid overcrowding:
Start simple: Begin with the main branches and add a few lees. Use clusters: Group lees in clusters rather than drawing each leaf. Space out: Lee some open areas to give the tree a natural look.Remember, less is more. Keeping your drawing simple will make it look more realistic and pleasing.
 Frequently Asked Questions
What Materials Do I Need To Draw A Tree?
Frequently Asked Questions
What Materials Do I Need To Draw A Tree?
To draw a tree, you’ll need paper, pencils, and an eraser. Optional items include colored pencils or markers.
How Do I Start Drawing A Tree?Begin by sketching the trunk and main branches. Then, add smaller branches and lees.
What Are The Basic Steps To Draw A Tree?First, draw the trunk and main branches. Next, add smaller branches. Finally, sketch lees and details.
How Can I Make My Tree Drawing Realistic?Use shading and texture to add depth. Observe real trees for reference. Practice different leaf shapes and branch patterns.
ConclusionDrawing a tree can be a fun and creative process. Follow these steps, and practice regularly. Start with simple shapes. Add details like branches and lees. Experiment with different styles. Use shading to give depth and texture. Don’t worry about mistakes.
They help you learn and improve. Enjoy the journey of drawing. Each tree will be unique. Share your art with others. Keep drawing and let your creativity grow!